In this article, we will share how to using apache2 mod_auth_openidc module with Keycloak (OpenID Connect)
1) Presentation
The usage of the apache2 mod_auth_openidc module is to act as RP (Relying Party) when discussing with OP (OpenID connect Provider).
The apache2 mod_auth_openidc module allows to hide all the complexity of the openid/oauth2 protocol behind the scenes to the end user.
The apache2 mod_auth_openidc module is acting as a RP:
- It has to be registered as a keycloak client
- It is using Authorization code flow when interacting with keycloak (which is the most secure form of authentication)
It can also provides additional information, such as access or refresh tokens using a specific hook.
2) openID protocol recap
mod_auth_openidc enables an Apache 2.x web server to operate as an OpenID Connect Relying Party (RP) to an OpenID Connect Provider (OP).

|
OpenID procol provides the following
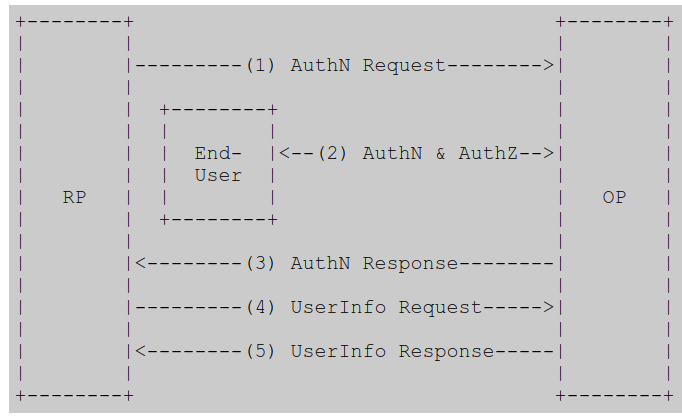
The RP (Client) sends a request to the OpenID Provider (OP). The OP authenticates the End-User and obtains authorization. The OP responds with an ID Token and usually an Access Token. The RP can send a request with the Access Token to the UserInfo Endpoint. The UserInfo Endpoint returns Claims about the End-User. https://openid.net/specs/openid-connect-core-1_0.html#toc |
It authenticates users against an OpenID Connect Provider, receives user identity information from the OP in a so called ID Token and passes the identity information (a.k.a. claims) in the ID Token to applications hosted and protected by the Apache web server.
It can also be configured as an OAuth 2.0 Resource Server (RS), consuming bearer access tokens and validating them against an OAuth 2.0 Authorization Server, authorizing the Clients based on the validation results.
The protected content and/or applications can be served by the Apache server itself or it can be served from elsewhere when Apache is configured as a Reverse Proxy in front of the origin server(s).
Pointer:
https://github.com/zmartzone/mod_auth_openidc
Concretely, it means that it is possible to protect a web URL using apache2 being used as reverse proxy with mod_auth_openidc module. The Authorization flow used is authorization code which is the most the secure. Apache2 server is considered as a RP (Relying Party) and is masking off the complexity of exchanging an authorization access code against an access token behind the scenes.
From upper level, the user doesn’t have a clue of the complexity which is taking place here, almost unnoticed.
3) Putting mod_auth_openidc in place
The operations to perform to put mod_auth_openidc in place are:
- configuration of an apache2 server with mod_auth_openidc module enabled
- configuration of a client_id with RH_SSO (using authorisation code)
- configuration of mod_auth_openidc module with this client_id
4) Enabling mod_auth_openidc module with apache2
4.1) Getting hold of the library
|
mod_auth_openidc library is part of following distribution: ubuntu, debian, rpm For windows support: Source can be recompiled from distribution Or you can contact the supplier |
For example ubuntu 18.0.4 (bionic) embedds the following version
| libapache2-mod-auth-openidc (2.3.3-1build1) |
4.2) Configuring keycloak Server for mod_auth_openidc
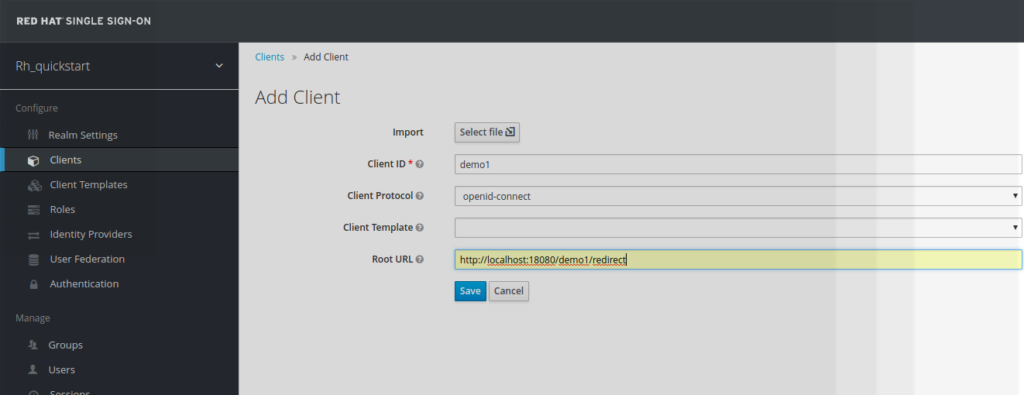
A new client_id of type confidential is configured within RH-SSO rh_quickstart realm.

The user has to provide the following piece of information:
- client_id name
(demo1 in our example) - redirect_url
( https://localhost:18080/demo1/redirect in our example )
The client has to be of type confidential. In return is provided a
client_secret, which is also going to be used in
mod_auth_openidc configuration
(ef1e175f-7902-4e1d-8ff1-e963f08b45f2
in this example)

4.3) Configuration of mod_auth_openidc module
The part to be added to the mod_auth_openidc module is:
-
IP address of the
virtual host
(18080 here) - OIDCCryptoPassphrase
-
OIDCProviderMetadataURL
https://localhost:8180/auth/realms/rh_quickstart/.well-known/openid-configuration -
OIDCClientID
demo1 -
OIDCClientSecret
ef1e175f-7902-4e1d-8ff1-e963f08b45f2 -
OIDCRedirectURI
https://localhost:18080/demo1/redirect
On ubuntu the module mod_auth_openidc is located in file:
- /etc/apache2/mods-available/auth_openidc.conf
|
LoadModule
auth_openidc_module modules/mod_auth_openidc.so
ServerName ${HOSTIP} Listen 18080 http <VirtualHost *:18080> ServerAdmin webmaster@localhost DocumentRoot /var/www/html #this is required by mod_auth_openidc OIDCCryptoPassphrase a-random-secret-used-by-apache-oidc-and-balancer OIDCProviderMetadataURL https://localhost:8180/auth/realms/rh_quickstart/.well-known/openid-configuration OIDCClientID demo1 OIDCClientSecret ef1e175f-7902-4e1d-8ff1-e963f08b45f2 OIDCRedirectURI https://localhost:18080/demo1/redirect # maps the prefered_username claim to the REMOTE_USER environment variable # OIDCRemoteUserClaim preferred_username <Location /demo1 > AuthType openid-connect Require valid-user Loglevel debug </Location> </VirtualHost> |
Once module mod_auth_openidc configured, the server apache needs to be restarted
| sudo apache2 restart |
The apache2 logs can be found below:
/var/logs/apache2
5) Example
Step1 – login to the URL
The user is trying to access to URI
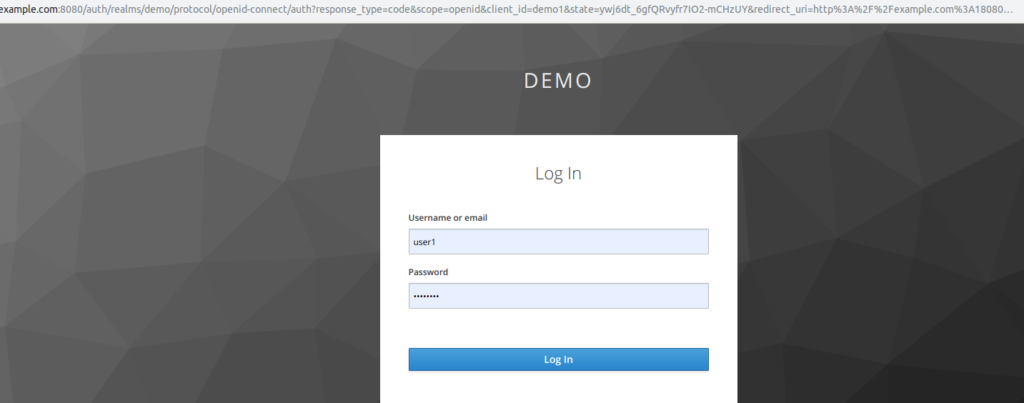
Step2 – Keycloak Login screen
The mod_auth_openidc module has intercepted the User URI request and has redirected to keycloak, which is asking the user to authenticate.

Step 3 – After successful authentication
The user is redirected to the site URL, after successful authentication

6) Using the hook mod_auth_openidc
Le module mod_auth_openidc provides a hook which allows to display many information such as access_token, refresh_token, user_info
| #OIDCInfoHook [iat|access_token|access_token_expires|id_token|userinfo|refresh_token|session]+OIDCInfoHook userinfo |
The hook is accessed directly at the redirect uri and appending ?info=json

Hook behavior is also
described
https://github.com/zmartzone/mod_auth_openidc/wiki/Access-Tokens-and-Refresh-Tokens
7) Keycloak and NGINX
NGINX is also popular web server, and offers the same functionality as apache2.
The equivalent functionality which provides openid support for NGINX withkeycloak is LUA
And also :
https://eclipsesource.com/blogs/2018/01/11/authenticating-reverse-proxy-with-keycloak/
- New Keycloak online training - 19 janvier 2022
- Sizing Keycloak or Redhat SSO projects - 8 juin 2021
- Keycloak.X Distribution - 28 janvier 2021