The goal of this article is to explain how it is possible using client scopes with RedHat SSO keycloak .
Client scopes are entities in Keycloak, which are configured at the realm level and they can be linked to clients. The client scopes are referenced by their name when a request is sent to the Keycloak authorization endpoint with a corresponding value of the scope parameter.
Scope and claims Openid Core definition
OpenID core specification provides the following definition of scopes and claims
https://openid.net/specs/openid-connect-core-1_0.html#ScopeClaims
Requesting Claims using Scope Values
OpenID Connect Clients use scope values, as defined in Section 3.3 of OAuth 2.0 [RFC6749], to specify what access privileges are being requested for Access Tokens. The scopes associated with Access Tokens determine what resources will be available when they are used to access OAuth 2.0 protected endpoints. Protected Resource endpoints MAY perform different actions and return different information based on the scope values and other parameters used when requesting the presented Access Token.
For OpenID Connect, scopes can be used to request that specific sets of information be made available as Claim Values.
Claims requested by the following scopes are treated by Authorization Servers as Voluntary Claims.
OpenID Connect defines the following scope values that are used to request Claims:
profile
OPTIONAL. This scope value requests access to the End-User’s default profile Claims, which are: name, family_name, given_name, middle_name, nickname, preferred_username, profile, picture, website, gender, birthdate, zoneinfo, locale, and updated_at.
OPTIONAL. This scope value requests access to the email and email_verified Claims.
address
OPTIONAL. This scope value requests access to the address Claim.
phone
OPTIONAL. This scope value requests access to the phone_number and phone_number_verified Claims.
Multiple scope values MAY be used by creating a space delimited, case sensitive list of ASCII scope values.
The Claims requested by the profile, email, address, and phone scope values are returned from the UserInfo Endpoint, as described in Section 5.3.2, when a response_type value is used that results in an Access Token being issued. However, when no Access Token is issued (which is the case for the response_type value id_token), the resulting Claims are returned in the ID Token.
In some cases, the End-User will be given the option to have the OpenID Provider decline to provide some or all information requested by RPs. To minimize the amount of information that the End-User is being asked to disclose, an RP can elect to only request a subset of the information available from the UserInfo Endpoint.
The following is a non-normative example of an unencoded scope request:
scope=openid profile email phone
Using Scope and Claims
Scope:
- scopes allows to control/define a territory.
- Scope territory is made up of set of claims (elementary attributes)
- For example, applications may decide to expose only a set of their resources to external users.
- Within keycloak, the default is to define applications as “full scope” access. It means that everyone can have access to all the resources of the application.
- It is possible to limit access to certain resources using scopes
- OpenID Core Spec also predefines a list of predefined scopes such as profile, email, phone
OpenID client request need to specify the scope as follows, using the keyword scope as 1st predefined parameter of the client request
scope=openid profile email phone
Using scope with keycloak
In the following is shown how it is possible to retrieve/control scopes using keycloak.
Using Keycloak Access Token
An access token is a token which has a limited lifetime spann. When a user authenticates against keycloak client app using the openid protocol, it gets in return an id_token and access_token.
The access token is used to grant/deny access to resources according to the information defined in the access token.
Keycloak attribute and role scope
Keycloak allows to expose/retrieve in the access token attribute values (corresponding to elementary claims) and also role scope (corresponding to elementary claims)
Role scope within keycloak plays also an additional role, as it allows to grant/deny access to application based on the role scope value.
Keycloak access token example using scope
The example with keycloak to showcase scope usage with access token is based upon the LDAP example deployed in the previous chapter.
Some information such as postal code could be seen at seen at user level, but are not visible at access token level.
Accessing the access token using direct grant
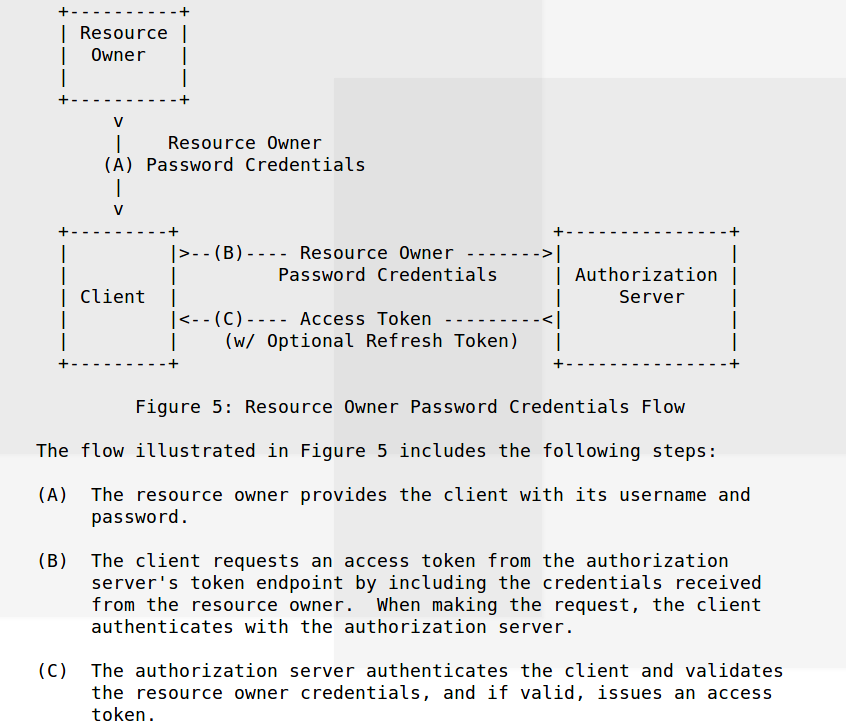
ROPC workflow definition
In order to get a better a grasp of keycloak scope manipulation, a script is provided to display the content of the access token.
Access token can be accessed easily using Oauth2 Resource Owner Password Credentials Grant
workflow (also called ROPC)
• RFC 6749 spec https://tools.ietf.org/html/rfc6749#section-4.3
Using this authentication flow mode, by itself is insecure
Enabling ROPC with keycloak
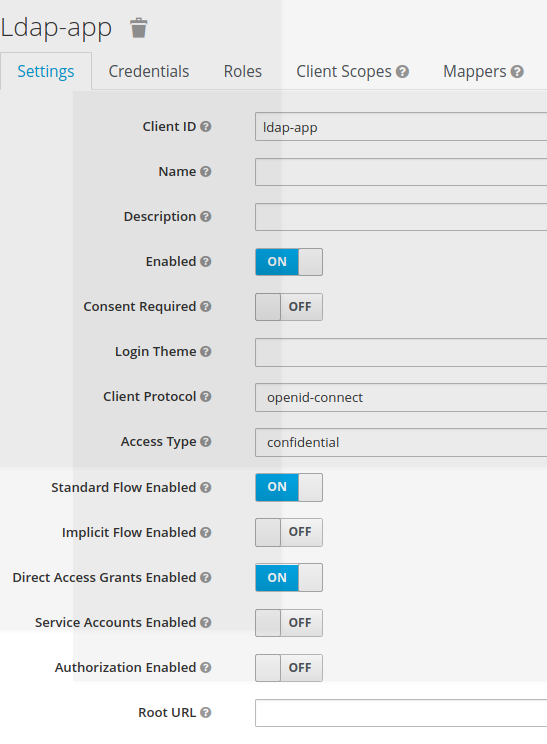
When a new OpenID client app is registered, ROPC flow by default is disabled. It has to be explicitly set to allow to use Resource Owner Password Credentials Grant workflow. The keycloak flow is called Direct Access Grant
Once Direct Access Grant is allowed, for a client application it is possible to script access token access using ropc workflow
Scripting Token Access using ROPC workflow
The script used to access an access token is:
access_token=
curl \
 -d "client_id=ldap-app" -d "client_secret=password" \
 -d "username=jbrown" -d "password=password" \
 -d "grant_type=password"  \
 -d "scope=openid"  \
 https://localhost:8180/auth/realms/ldap-demo/protocol/openid-connect/token  | jq -r '.access_token'
curl –header « Authorization: Bearer $access_token » \
https://localhost:8180/auth/realms/ldap-demo/protocol/openid-connect/userinfo | jq .
Not having postalcode attribute exposed within keycloak access token is due to the fact that:
- the attribute postalcode is added (i.e. mapped) attribute
- it is not defined in the standard scopes, such as profile, email …
sh access_token_jbrown_openid.sh
{
« sub »: « e94eebf2-48fe-4a1d-b1c5-12d7018f6f7a »,
« email_verified »: false,
« name »: « James Brown »,
« preferred_username »: « jbrown »,
« given_name »: « James »,
« family_name »: « Brown »,
« email »: « jbrown@keycloak.org »
}
This script allows to display usual openid elements, but does not provide information such as postalcode, which was part of keycloak SSO user entry.

The only way to expose postalcode attribute is to define a new scope within keycloak, which will contain postal code as a new claim.
Creating a new scope to expose postalcode claim
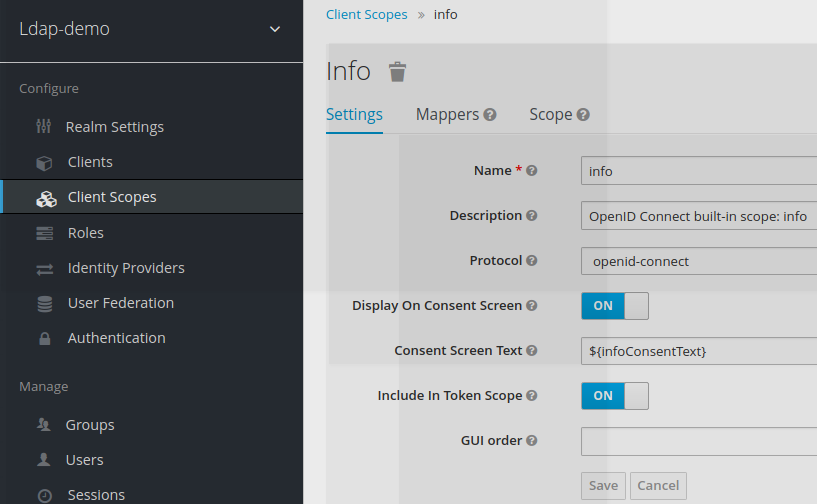
Creating info scope within ldap-demo realm
A new scope called info is created, as part of the client scopes available for the ldap-demo realm
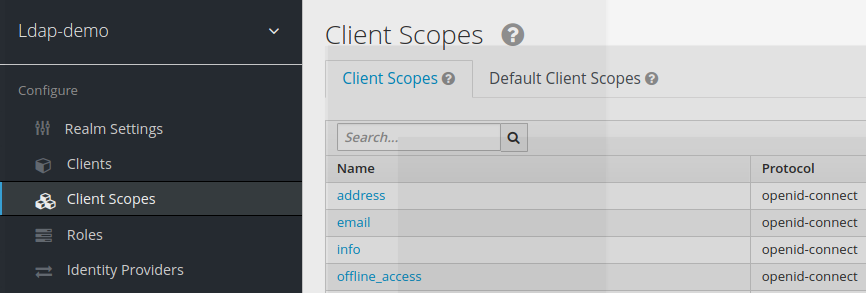
Once created, this new scope appears in the list of available scopes
Mappers of info scope
The info scope exposes claims attributes at user level. Those claims attributes are retived using mappers.
The info scope to expose the postalcode attribute value should expose a postal mapper.
The postal code mapper is created as follows:
• Name: postal code mapper
• Mapper Type: User Attribute
• User Attribute: postalcode
• Token claim Name: postal_code
Somme remarks:
- The mapper type used is User Attribute. It means that it corresponds to the value that is directly taken from the keyclak SSO postalcode
- The User Attribute is postalcode (as described before)
- The token claim Name is the claim name which is exposed as in corresponding the access token scope value. (postal_code)
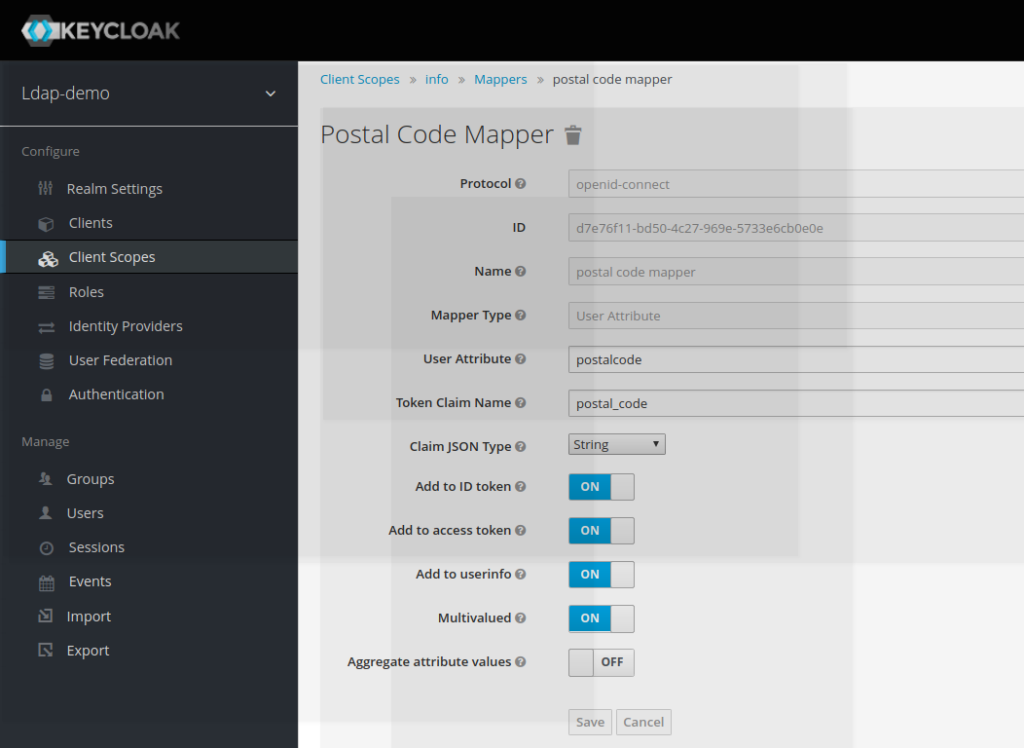
The following flags need to be set:
- Add to the access token
- Add to userinfo
- Multivalued
The postal code mapper is now part of the info claim
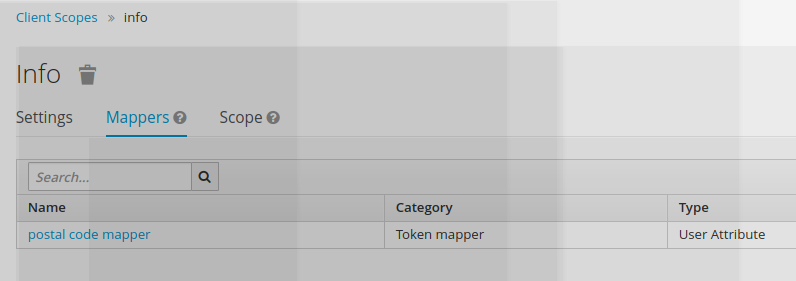
Using the new scope in REST API query
The new scope info is added to the the client request, used to retrieve the postalcode claim value.
• « scope=openid info »
But, the request at this does not yet expose the postalcode claim, as client scope has not yet been provisioned to cope with.
access_token=
curl \
 -d "client_id=ldap-app" -d "client_secret=password"
 -d "username=jbrown" -d "password=password" \
 -d "grant_type=password"  \
 -d "scope=openid info"  \
 https://localhost:8180/auth/realms/ldap-demo/protocol/openid-connect/token  | jq -r '.access_token'
curl –header « Authorization: Bearer $access_token » \
https://localhost:8180/auth/realms/ldap-demo/protocol/openid-connect/userinfo | jq .
The output obtained for the access token is
sh access_token_jbrown_postalcode_1.sh
{
« sub »: « e94eebf2-48fe-4a1d-b1c5-12d7018f6f7a »,
« email_verified »: false,
« name »: « James Brown »,
« preferred_username »: « jbrown »,
« given_name »: « James »,
« family_name »: « Brown »,
« email »: « jbrown@keycloak.org »
}
Configuring keycloak client scope
Configuring info scope as an optional client scope
When the info scope has been created for the ldap demo realm. Info has become a new scope, which falls in the list available client scopes.
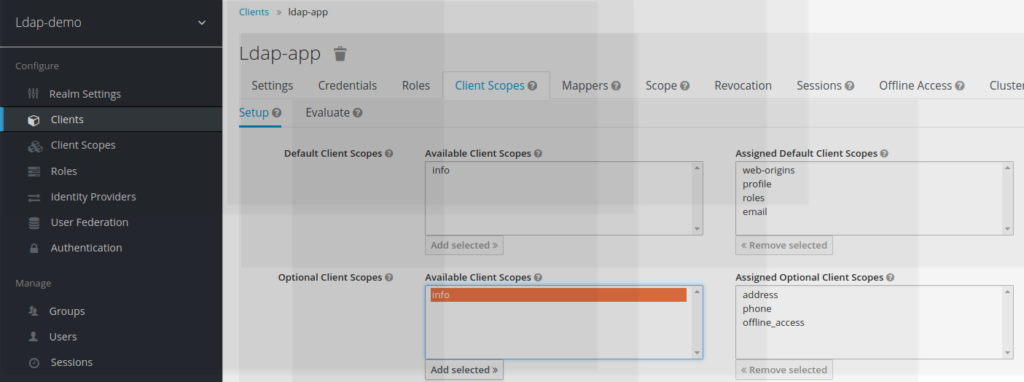
To become effective, this new scope has to be mentioned as an assigned optional client scope
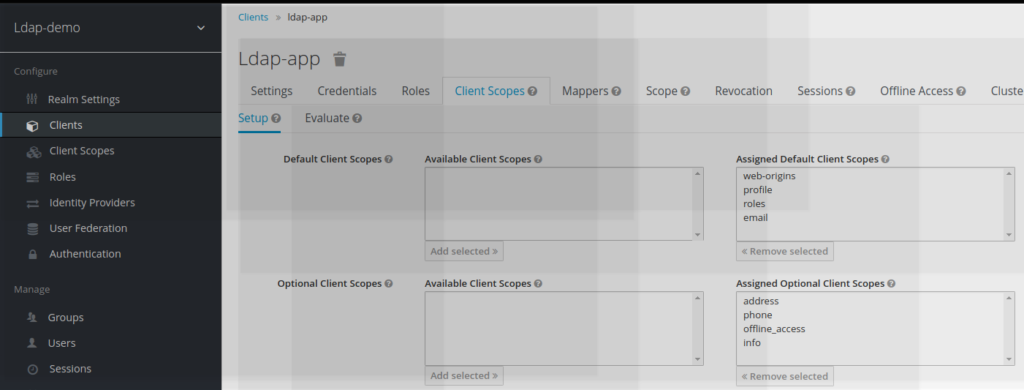
ResT API query displaying info scope
The rest API script is now displaying the postal code information
access_token=`curl \
-d « client_id=ldap-app » -d « client_secret=password » \
-d « username=jbrown » -d « password=password » \
-d « grant_type=password » \
-d « scope=openid info » \
https://localhost:8180/auth/realms/ldap-demo/protocol/openid-connect/token | jq -r ‘.access_token’`
curl –header « Authorization: Bearer $access_token » \
https://localhost:8180/auth/realms/ldap-demo/protocol/openid-connect/userinfo | jq .
sh access_token_jbrown_postalcode_1.sh
{
« sub »: « e94eebf2-48fe-4a1d-b1c5-12d7018f6f7a »,
« email_verified »: false,
« name »: « James Brown »,
« preferred_username »: « jbrown »,
« postal_code »: [
« 88441 »
],
« given_name »: « James »,
« family_name »: « Brown »,
« email »: « jbrown@keycloak.org »
}
Using keycloak Generator to evaluate scope
Introducing a ROPC (direct access grant flow) and script to manipulate the access token token is not always the most handy way to access and test scopes.
Keycloak provides also a built-in generator which allows to test scope directly
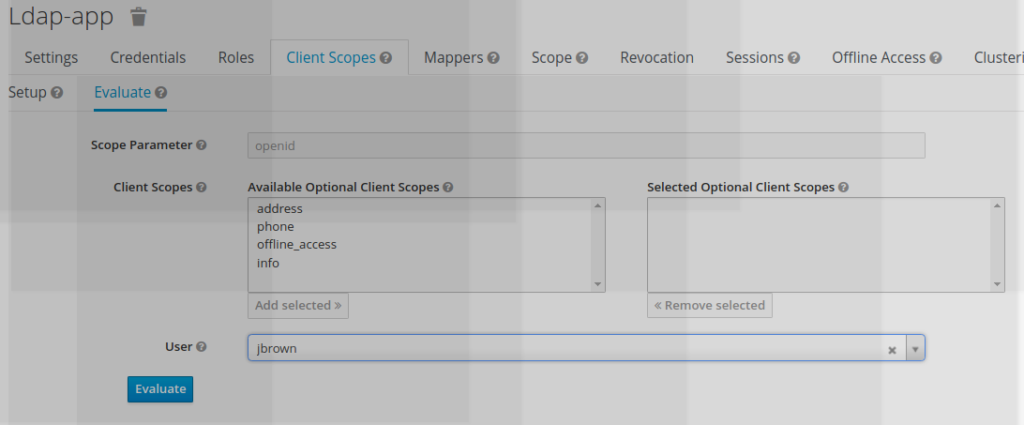
• Select Client scope TAB
• Select Evaluate
• Select a user (jbrown for example)
• Select info as optional client scope
• Click on Evaluate Button
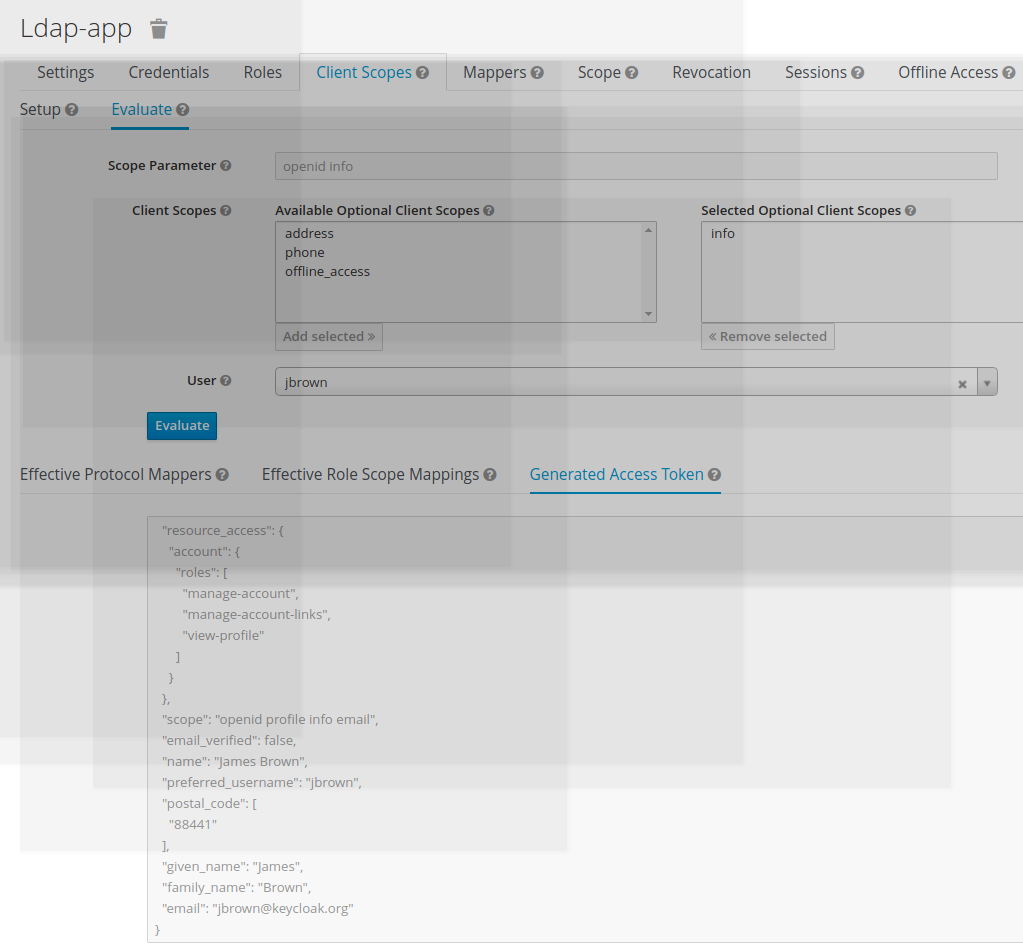
• Click on “generate access token”
The info scope is display with the token claim postal_address
- New Keycloak online training - 19 janvier 2022
- Sizing Keycloak or Redhat SSO projects - 8 juin 2021
- Keycloak.X Distribution - 28 janvier 2021